Kubernetes Exercises
Table of Contents
- Basic Commands
- Pod Creation
- Logging Exercises
- ConfigMaps
- Deployments
- Pod Restart Policy
- Pod Scheduling
- Service Accounts
- Deployment Rollbacks
- Rollout Strategies
- Taints and Tolerations
- Certificates and Authentication
- Kubernetes PKI
- Cluster Upgrades
- ETCD Backup and Restore
- DNS and Service Discovery
- Persistent Volumes
- NFS Volumes
- Priority Classes
- Database Operators
- Gateway API
- Application Debugging
Basic Commands
Quick SSH: Check and Restart kubelet
# SSH into a node
ssh user@node-ip # or ssh <nodename>

# Check kubelet status
sudo systemctl status kubelet -n 20

# If you see kubelet inactive or dead, start again
sudo systemctl start kubelet

# Verify
sudo systemctl status kubelet

# Then exit from the node
exit

# In control plane check k8s nodes
kubectl get nodes
List API Resources
List all API resources in your Kubernetes cluster. Save the output to a file named "resources.csv".
kubectl api-resources > resources.csv # '>' saves result into resources.csv
List Linux Services
List the services on your Linux operating system that are associated with Kubernetes. Save the output to a file named services.csv.
# List unit files with systemctl and grep for 'kube'
sudo systemctl list-unit-files --type service --all | grep kube > services.csv
Get Kubelet Status
List the status of the kubelet service running on the Kubernetes node and output the result to a file named kubelet-status.txt saving the file in the /tmp directory.
sudo systemctl status kubelet > /tmp/kubelet-status.txt
List Kubernetes Services
List all the services and save the output to a file named services.txt using kubectl command.
kubectl get svc -A > services.txt
Check your services.txt with cat services.txt
List Pods and IP Addresses
List all the pods in the kube-system namespace along with their IP addresses and save the output to a file named pods.txt.
kubectl -n kube-system get pods -o wide > pods.txt
Check your pods.txt with cat pods.txt
Pod Creation
Create a Pod Declaratively
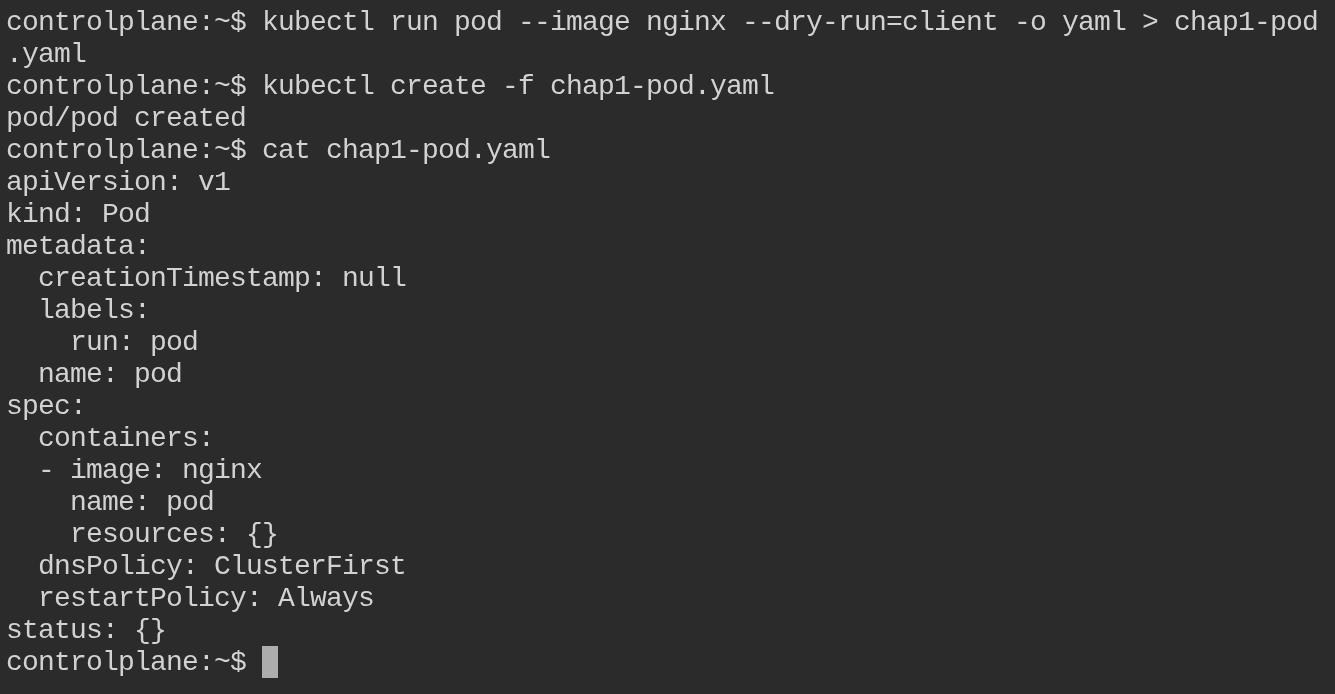
Create a YAML file using kubectl for a pod named pod that uses the image nginx.
kubectl run pod --image nginx --dry-run=client -o yaml > my-pod.yaml
This command helps you generate a preconfigured YAML file where you can make changes according to your requirements.
Generated my-pod.yaml:
apiVersion: v1
kind: Pod
metadata:
  creationTimestamp: null
  labels:
    run: pod
  name: pod
spec:
  containers:
  - image: nginx
    name: pod
    resources: {}
  dnsPolicy: ClusterFirst
  restartPolicy: Always
status: {}
Create the pod:
kubectl create -f my-pod.yaml
Logging Exercises
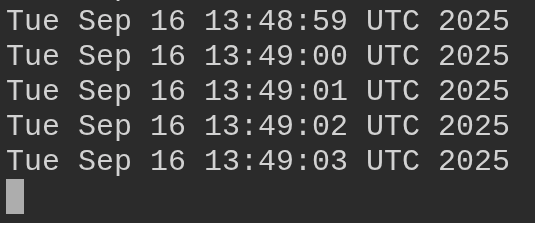
Create a Pod that Logs to STDOUT
Create a pod with one container that will log to STDOUT. Use kubectl to view the logs from this container within the pod named "pod-logging".
Create pod-logging.yaml:
cat << EOF > pod-logging.yaml
apiVersion: v1
kind: Pod
metadata:
  name: pod-logging
spec:
  containers:
  - name: main
    image: busybox
    args: [/bin/sh, -c, 'while true; do echo $(date); sleep 1; done']
EOF
Create and view logs:
kubectl create -f pod-logging.yaml

kubectl logs pod-logging

kubectl logs pod-logging -f  # -f is for follow
Create a Pod with Sidecar Container
What is a sidecar container? A sidecar container is a secondary container that runs alongside the main application container in a pod. It typically provides auxiliary functions such as logging, monitoring, or proxying.
Task: Create a pod that will have two containers, one main container and another sidecar container that will collect the main container's logs. Use kubectl to view the logs from the container named "sidecar".
Create pod-logging-sidecar.yaml:
cat << EOF > pod-logging-sidecar.yaml
apiVersion: v1
kind: Pod
metadata:
  name: pod-logging-sidecar
spec:
  containers:
  - image: busybox
    name: main
    args: [ 'sh', '-c', 'while true; do echo "$(date)\n" >> /var/log/main-container.log; sleep 5; done' ]
    volumeMounts:
      - name: varlog
        mountPath: /var/log
  - name: sidecar
    image: busybox
    args: [ /bin/sh, -c, 'tail -f /var/log/main-container.log' ]
    volumeMounts:
      - name: varlog
        mountPath: /var/log
  volumes:
    - name: varlog
      emptyDir: {}
EOF
Create and view logs:
kubectl create -f pod-logging-sidecar.yaml

kubectl logs pod-logging-sidecar -c sidecar # -c is for container name

kubectl logs pod-logging-sidecar --all-containers

kubectl logs pod-logging-sidecar --all-containers -f # -f is for follow
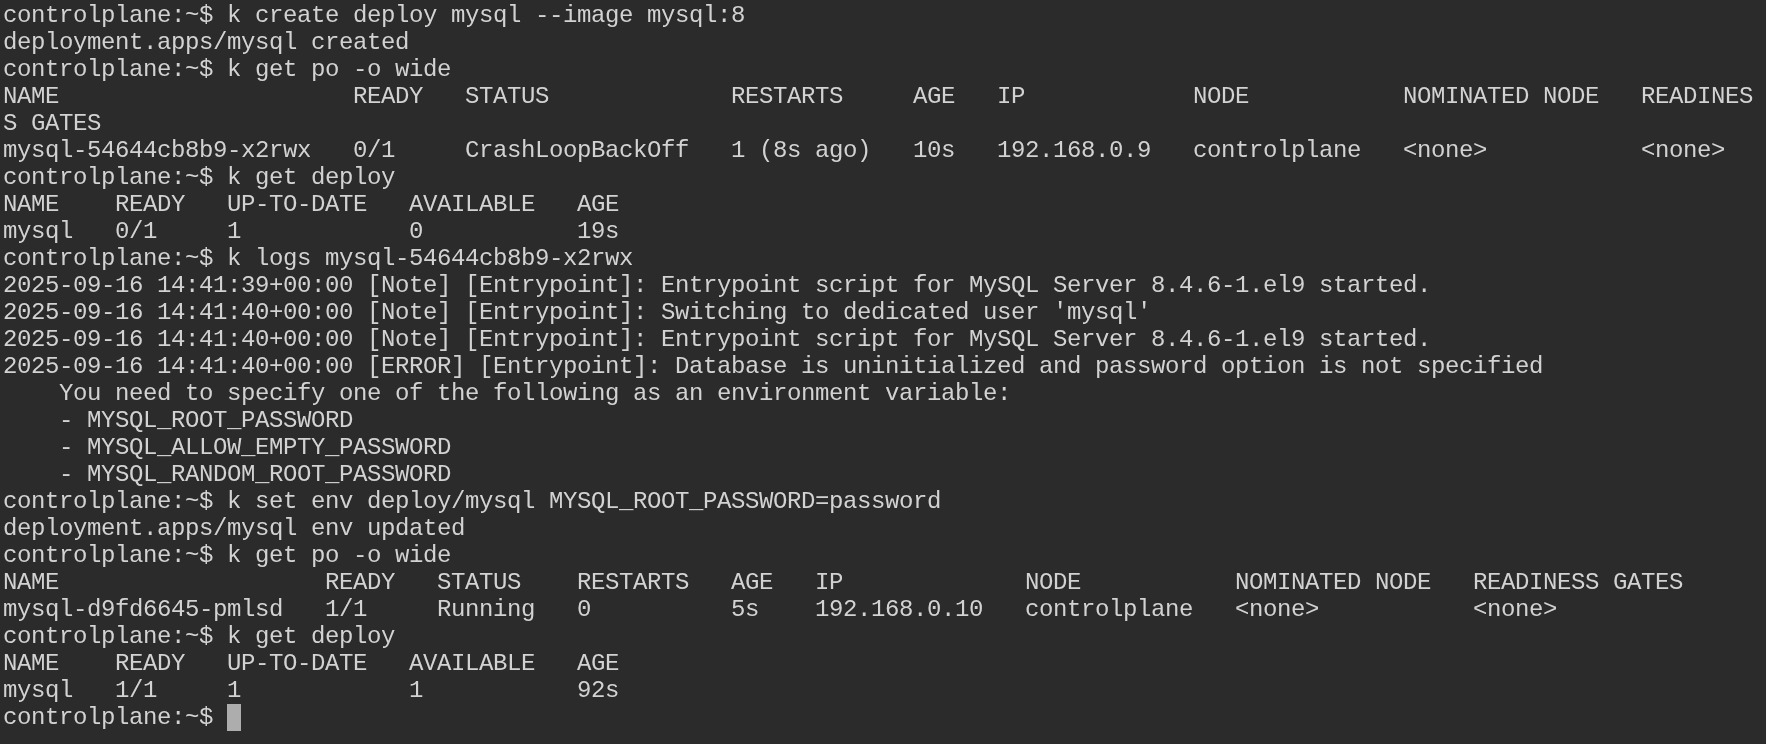
Create and Fix MySQL Deployment
Create a deployment named "mysql" that uses the image "mysql:8":
kubectl create deploy mysql --image mysql:8
View the deployment and pod, and find out why it's not running:
kubectl get po -o wide
# You can see an error with mysql pod; mentioned as CrashLoopBackOff or ImagePullBackOff
kubectl describe pod mysql-xxxx # replace xxxx with your pod id

kubectl get deploy

kubectl logs mysql-xxxx # replace xxxx with your pod id

Fix the deployment to get the pod in a running state:
Method 1:
kubectl edit deploy mysql
Add the following env section under spec.template.spec.containers[0]:
env:
  - name: MYSQL_ROOT_PASSWORD
    value: "password"
Method 2:
kubectl set env deploy/mysql MYSQL_ROOT_PASSWORD=password

kubectl get po -o wide
ConfigMaps
Create a ConfigMap
Create a configmap named redis-config. Within the configMap, use the key maxmemory with value 2mb and key maxmemory-policy with value allkeys-lru.
Quickly create a YAML file for the configMap:
kubectl create cm -h # for help

kubectl create cm redis-config --from-literal=redis.conf=config --dry-run=client -o yaml > redis-config.yaml
Open the file redis-config.yaml and insert the multi-line values for redis.conf:
apiVersion: v1
data:
  redis.conf: |
    maxmemory 2mb
    maxmemory-policy allkeys-lru
kind: ConfigMap
metadata:
  creationTimestamp: null
  name: redis-config
Create the configMap from the file:
kubectl apply -f redis-config.yaml
Create Pod with ConfigMap
Create a pod named redis-pod that uses the image redis:7 and exposes port 6379. Use the command redis-server /redis-master/redis.conf to store redis configuration data and store this in an emptyDir volume.
Mount the redis-config configmap as a volume to the pod for use within the container.
kubectl run redis-pod --image=redis:7 --port 6379 --command 'redis-server' '/redis-master/redis.conf' --dry-run=client -o yaml > redis-pod.yaml
Open the file redis-pod.yaml and modify it to include the volume and volumeMount sections:
apiVersion: v1
kind: Pod
metadata:
  labels:
    run: redis-pod
  name: redis-pod
spec:
  containers:
  - command:
    - redis-server
    - /redis-master/redis.conf
    image: redis:7
    name: redis-pod
    volumeMounts:
      - name: config-volume
        mountPath: /redis-master
    ports:
    - containerPort: 6379
  volumes:
    - name: config-volume
      configMap:
        name: redis-config
Create the pod from the file:
kubectl apply -f redis-pod.yaml
Why are we using configMap as volume? Using a ConfigMap as a volume allows you to decouple configuration data from container images, making it easier to manage and update configurations without rebuilding images. It also enables sharing configuration data across multiple pods and containers, promoting consistency and reducing duplication.
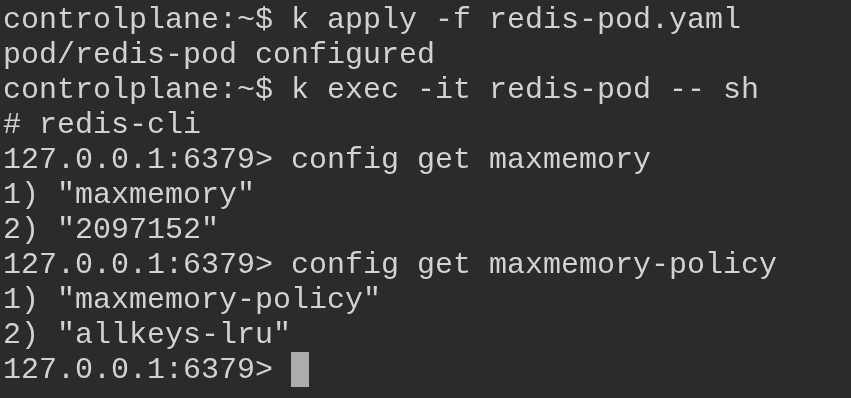
Check Pod Configuration Settings
Get a shell to the redis-pod pod and open the redis cli to confirm the values have been applied.
Get inside redis-pod and use redis cli:
kubectl exec -it redis-pod -- sh
Once inside redis shell, run the following commands to get the maxmemory and maxmemory-policy configuration setting:
redis-cli
config get maxmemory
config get maxmemory-policy
Deployments
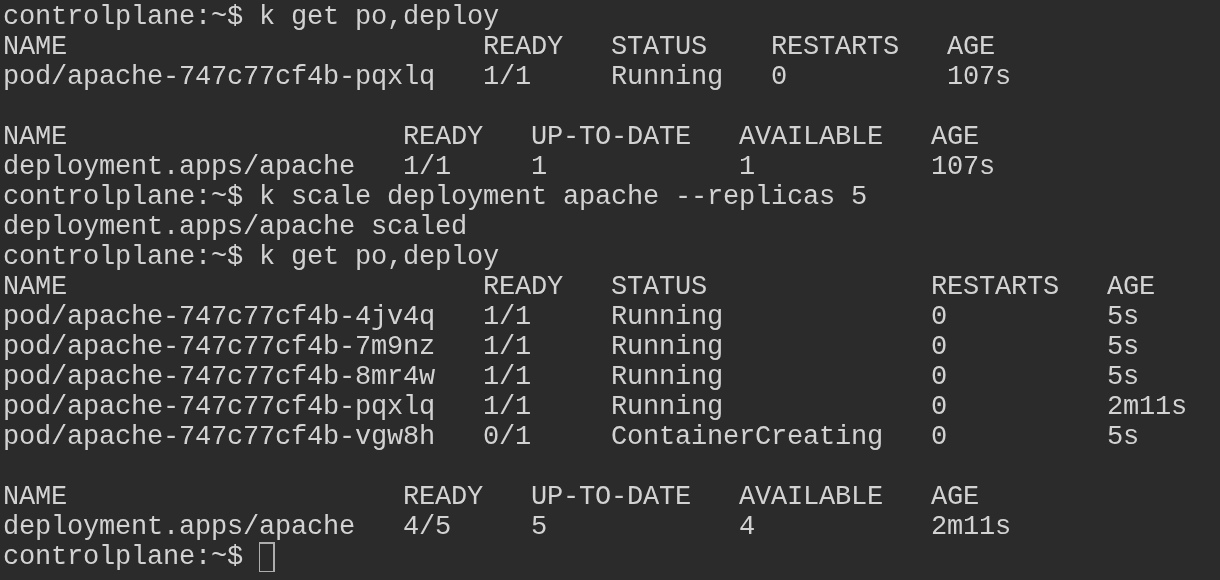
Create and Scale Apache Deployment
Create a deployment named "apache" that uses the image httpd:latest:
kubectl create deploy apache --image httpd:latest

kubectl get po,deploy
Scale the deployment named 'apache' to 5:
# Scale the apache deployment to 5 replicas
kubectl scale deploy apache --replicas 5

# List the now 5 pods in the deployment
kubectl get deploy,po
Change Deployment Image
Create a deployment named "apache" that uses the image httpd:2.4.54 and contains three pod replicas:
kubectl create deploy apache --image=httpd:2.4.54 --replicas 3

# List the deployment and the pods in that deployment
kubectl get deploy,po
Scale the deployment named 'apache' from 3 replicas to 5:
kubectl scale deploy apache --replicas 5

kubectl get po,deploy
Change the image used for the pods in the 'apache' deployment to httpd:alpine:
kubectl set image deploy/apache httpd=httpd:alpine

kubectl get deploy apache -o yaml | grep image
Pod Restart Policy
Create Pod with Restart Policy
Create a pod named busybox that has busybox image.
kubectl run busybox --image busybox
kubectl get po will show you CrashLoopBackOff error and trying to restart automatically.
Change the restartPolicy to prevent the pod from automatically restarting:
kubectl edit po busybox
# pod.yaml
apiVersion: v1
kind: Pod
metadata:
  labels:
    run: busybox
  name: busybox
spec:
  containers:
  - image: busybox
    name: busybox
  restartPolicy: Never # change this from Always to Never
Pod Scheduling
Schedule Pod to Specific Node
Create a pod named ctrl-pod which uses the nginx image in your created namespace. This pod should be scheduled to the control plane node.
kubectl -n my-namespace run ctrl-pod --image nginx --dry-run=client -o yaml > my-pod.yaml
Generated YAML:
apiVersion: v1
kind: Pod
metadata:
  creationTimestamp: null
  labels:
    run: ctrl-pod
  name: ctrl-pod
  namespace: my-namespace
spec:
  containers:
  - image: nginx
    name: ctrl-pod
    resources: {}
  dnsPolicy: ClusterFirst
  restartPolicy: Always
status: {}
Create Pod with Node Affinity
Create a pod named az1-pod in a namespace which uses the nginx:1.24.0 image. This pod should use node affinity, and prefer during scheduling to be placed on the node with the label availability-zone=zone1 with a weight of 80.
Also, have that same pod prefer to be scheduled to a node with the label availability-zone=zone2 with a weight of 20.
kubectl -n my-namespace run az1-pod --image nginx:1.24.0 --dry-run=client -o yaml > az1-pod.yaml
Modified YAML with Node Affinity:
apiVersion: v1
kind: Pod
metadata:
  creationTimestamp: null
  labels:
    run: az1-pod
  name: az1-pod
  namespace: my-namespace
spec:
  affinity:
    nodeAffinity:
      preferredDuringSchedulingIgnoredDuringExecution:
      - weight: 80
        preference:
          matchExpressions:
          - key: availability-zone
            operator: In
            values:
            - zone1
      - weight: 20
        preference:
          matchExpressions:
          - key: availability-zone
            operator: In
            values:
            - zone2
  containers:
  - image: nginx:1.24.0
    name: az1-pod
    resources: {}
  dnsPolicy: ClusterFirst
  restartPolicy: Always
status: {}
Apply the configuration:
kubectl -n my-namespace apply -f az1-pod.yaml
Node Affinity Types:
- requiredDuringSchedulingIgnoredDuringExecution - Mandatory affinity. Pod only scheduled on nodes meeting criteria. If no nodes available, pod remains unscheduled.
- preferredDuringSchedulingIgnoredDuringExecution - Optional affinity. Scheduler tries to place pod on preferred nodes, but can schedule elsewhere if needed.
Service Accounts
Create Service Account for Pod
Create a new service account named 'secure-sa' in the default namespace that will not automatically mount the service account token.
Create service account YAML:
# Create the YAML for a service account named 'secure-sa' with the '--dry-run=client' option
kubectl -n default create sa secure-sa --dry-run=client -o yaml > sa.yaml
Add automount configuration:
# Add the automountServiceAccountToken: false to the end of the file 'sa.yaml'
echo "automountServiceAccountToken: false" >> sa.yaml
Create and verify service account:
# Create the service account from the file 'sa.yaml'
kubectl create -f sa.yaml

# List the newly created service account
kubectl -n default get sa
Create Pod with Service Account
Create a pod that uses the previously created 'secure-sa' service account. Make sure the token is not exposed to the pod!
Create pod YAML:
# Create the YAML for a pod named 'secure-pod' using the service account
kubectl -n default run secure-pod --image=nginx --serviceaccount=secure-sa --dry-run=client -o yaml > pod.yaml
Generated pod YAML:
apiVersion: v1
kind: Pod
metadata:
  name: secure-pod
spec:
  serviceAccountName: secure-sa
  containers:
  - image: nginx
    name: secure-pod
Create and verify pod:
# Create the pod from the file 'pod.yaml'
kubectl apply -f pod.yaml

# List the pods in the default namespace and wait until the pod is running
kubectl -n default get po
Verify Token is Not Mounted
# Get a shell to the pod and try to output the token (should fail)
kubectl exec secure-pod -- cat /var/run/secrets/kubernetes.io/serviceaccount/token
Expected output:
cat: /var/run/secrets/kubernetes.io/serviceaccount/token: No such file or directory
command terminated with exit code 1
This confirms that the service account token is not mounted to the pod, providing better security.
Deployment Rollbacks
Rollback a Deployment
Create a deployment named "apache" that uses the image httpd.
kubectl create deploy apache --image httpd

kubectl get deploy,po
Change the image from httpd to httpd:2.4.54. List the events of the replicasets in the cluster:
kubectl set image deploy/apache httpd=httpd:2.4.54

kubectl describe rs
Roll back to a previous version of the deployment (the deployment with the image httpd):
kubectl rollout history deploy apache

kubectl rollout undo deploy apache

kubectl rollout status deploy apache
Rollout Strategies
Change Rollout Strategy
Create a deployment named source-ip-app that uses the image registry.k8s.io/echoserver:1.4.
kubectl create deploy source-ip-app --image registry.k8s.io/echoserver:1.4

kubectl get deploy,pod
For the deployment named source-ip-app, change the rollout strategy to "Recreate":
# Edit the deployment and change the rollout strategy to recreate
kubectl edit deploy source-ip-app
In the deployment YAML, modify the 'strategy'. Save and quit to apply the changes:
spec:
  progressDeadlineSeconds: 600
  replicas: 5
  revisionHistoryLimit: 10
  selector:
    matchLabels:
      app: source-ip-app
  strategy:
    type: Recreate
Verify the strategy change:
kubectl get deploy source-ip-app -o yaml | grep strategy -A3
Change the image used in the source-ip-app deployment to registry.k8s.io/echoserver:1.3:
# Change the image used for the 'source-ip-app' deployment
kubectl set image deploy source-ip-app echoserver=registry.k8s.io/echoserver:1.3

# Quickly check the pod as they recreate. Notice how the old version of the pod is deleted immediately, not waiting for the new pods to create.
kubectl get po
Taints and Tolerations
What are Taints and Tolerations?
Taints and tolerations work together to make sure pods don't get scheduled on wrong nodes. Taints are applied to nodes, tolerations are applied to pods. A node with a taint will reject any pod that doesn't have a matching toleration.
List Node Taints
List the taints for node01:
kubectl describe node node01 | grep -i taint

# Output:
Taints:             dedicated=special-user:NoSchedule
Create Pod with Toleration
Create a basic pod named nginx that uses the image nginx:
kubectl run nginx --image=nginx --dry-run=client -o yaml > pod.yaml
View the file and apply the correct toleration to this pod manifest for it to successfully get scheduled to node01.
Before Toleration:
apiVersion: v1
kind: Pod
metadata:
  labels:
    run: nginx
  name: nginx
spec:
  containers:
  - image: nginx
    name: nginx
After Toleration:
apiVersion: v1
kind: Pod
metadata:
  labels:
    run: nginx
  name: nginx
spec:
  tolerations:
  - key: "dedicated"
    value: "special-user"
    effect: "NoSchedule"
  containers:
  - image: nginx
    name: nginx
Update and view the pod:
# Update the pod
kubectl apply -f pod.yaml

# View the pod running
kubectl get po -o wide
What happens if you don't add the toleration? If you try to create a pod on node01 without a toleration, the pod will not be scheduled on that node due to the taint. The scheduler will prevent the pod from being placed on the node until a matching toleration is added.
Add Toleration to Pod
Create pod with nodeSelector:
cat << EOF | kubectl apply -f -
apiVersion: v1
kind: Pod
metadata:
  creationTimestamp: null
  labels:
    run: nginx
  name: nginx
spec:
  containers:
  - image: nginx
    name: nginx
  nodeSelector:
    kubernetes.io/hostname: controlplane
EOF
View the pod:
kubectl get po -o wide
Add the toleration for the taint that's applied to the controlplane node:
apiVersion: v1
kind: Pod
metadata:
  creationTimestamp: null
  labels:
    run: nginx
  name: nginx
spec:
  containers:
  - image: nginx
    name: nginx
  nodeSelector:
    kubernetes.io/hostname: controlplane
  tolerations:
  - key: "node-role.kubernetes.io/control-plane"
    operator: "Exists"
    effect: "NoSchedule"
Apply and view the pod:
kubectl apply -f pod.yaml

# View the pod
kubectl get po -o wide
Remove Taint from Node
If the pod is not running, fix the pod:
# Describe the pod to see issues
kubectl describe po nginx

# Describe the controlplane node to view the taint applied
kubectl describe no controlplane | grep Taint

# Get the pod to run on the control plane by removing the taint
kubectl taint no controlplane node-role.kubernetes.io/control-plane:NoSchedule-

# Check to see if the pod is now running and scheduled to the control plane node
kubectl get po -o wide
Certificates and Authentication
Create Certificate Signing Request (CSR)
Generate a private key and certificate signing request for a user named "carlton":
# Generate private key
openssl genrsa -out carlton.key 2048

# Generate certificate signing request
openssl req -new -key carlton.key -out carlton.csr -subj "/CN=carlton"
Important: Make sure to include the Common Name (CN) into your CSR, or else the certificate will become invalid.
Submit CSR to Kubernetes API
Store the CSR value in an environment variable:
export REQUEST=$(cat carlton.csr | base64 -w 0)
Create and submit the CSR to Kubernetes:
cat <<EOF | kubectl apply -f -
apiVersion: certificates.k8s.io/v1
kind: CertificateSigningRequest
metadata:
  name: carlton
spec:
  groups:
  - system:authenticated
  request: $REQUEST
  signerName: kubernetes.io/kube-apiserver-client
  usages:
  - client auth
EOF

# Verify the CSR was created
kubectl get csr
Approve CSR and Extract Certificate
Approve the CSR:
kubectl certificate approve carlton

# Verify the CSR was approved
kubectl get csr
Extract the client certificate:
kubectl get csr carlton -o jsonpath='{.status.certificate}' | base64 -d > carlton.crt
Configure kubectl with New User
Set credentials in kubeconfig:
kubectl config set-credentials carlton --client-key=carlton.key --client-certificate=carlton.crt --embed-certs
💡 TIP: You can remove the --embed-certs flag and they will remain pointers to the key and certificate files.
Set and use the context:
kubectl config set-context carlton --user=carlton --cluster=kubernetes

kubectl config use-context carlton

# Test if pods are running in web namespace
kubectl -n web get pods
View Kubelet Client Certificate
View the client certificate that the kubelet uses to authenticate to the Kubernetes API:
# View the kubelet client certificate and output to a file
cat /etc/kubernetes/kubelet.conf > kubelet-config.txt

# View the certificate using openssl
openssl x509 -in /var/lib/kubelet/pki/kubelet-client-current.pem -text -noout
Kubernetes PKI
PKI Essentials
The Kubernetes PKI is a set of components that secure communication between cluster components:
- Certificates - Used to authenticate and encrypt communication between components
- Keys - Used to encrypt and decrypt communication between components
Explore Certificates
Peek inside the certificates:
# View API server certificate
sudo openssl x509 -in /etc/kubernetes/pki/apiserver.crt -noout -text | egrep 'Subject:|Issuer:|DNS:|IP Address:'

# View CA certificate
sudo openssl x509 -in /etc/kubernetes/pki/ca.crt -noout -text | egrep 'Subject:|Issuer:'

# See how kubectl uses them
sudo egrep -n 'certificate-authority|client-certificate|client-key' /etc/kubernetes/admin.conf
Observation: admin.conf references the CA and a client cert/key from /etc/kubernetes/pki. This is how kubectl proves who you are to the API server.
Test PKI Security
Temporarily hide the API server's TLS private key:
sudo mv /etc/kubernetes/pki/apiserver.key /etc/kubernetes/pki/apiserver.key.bak
Open another terminal and monitor kubelet logs:
sudo journalctl -u kubelet -f
In the first terminal, trigger API server restart:
# Trigger the kubelet to restart the kube-apiserver static pod
sudo sed -i '1s/^/# trigger reload\n/' /etc/kubernetes/manifests/kube-apiserver.yaml

# Delete the running apiserver container via crictl
sudo crictl ps | awk '/kube-apiserver/{print $1}' | xargs -r sudo crictl rm -f

# Restart kubelet
sudo systemctl restart kubelet

# Test connectivity (should fail)
kubectl get nodes
Restore the key:
sudo mv /etc/kubernetes/pki/apiserver.key.bak /etc/kubernetes/pki/apiserver.key

# Verify recovery (may take a minute or two)
kubectl get --raw='/readyz?verbose' | head
kubectl get nodes
Key Takeaways:
/etc/kubernetes/pkicontains the security files of a kubeadm control plane- Certificates and keys allow API server, controller-manager, scheduler, and kubelet to trust each other
- The API server is a static Pod; kubelet continuously tries to restart it if something goes wrong
- admin.conf references the CA and client cert/key, letting kubectl authenticate
Cluster Upgrades
Kubeadm Installation
For detailed kubeadm installation instructions, refer to the official Kubernetes documentation or kubeadm setup guides.
Upgrading Kubernetes
Check current and target versions:
# Check the current and target version of control plane components
kubeadm upgrade plan
Upgrade kubeadm first:
# Check current kubeadm version
kubeadm version -o json | jq

# Upgrade kubeadm
sudo apt install -y kubeadm=1.30.1-1.1
Upgrade control plane components:
# Run upgrade plan again
kubeadm upgrade plan

# Upgrade components
kubeadm upgrade apply v1.30.1

# For forced upgrade (if needed)
kubeadm upgrade apply v1.33.5 --force
Note: You may receive this message: "Specified version to upgrade to 'v1.30.1' is higher than the kubeadm version 'v1.30.0'. Upgrade kubeadm first using the tool you used to install kubeadm"
ETCD Backup and Restore
Backup ETCD
Set up environment for etcdctl:
export ETCDCTL_API=3
💡 TIP: etcd has its own server certificate which requires a valid client certificate and key located in /etc/kubernetes/pki/etcd
Create ETCD snapshot:
etcdctl snapshot save snapshot --cacert /etc/kubernetes/pki/etcd/ca.crt --cert /etc/kubernetes/pki/etcd/server.crt --key /etc/kubernetes/pki/etcd/server.key

# Check the status of your snapshot
etcdctl snapshot status snapshot --write-out table

Simulate Disaster
Delete kube-proxy daemonset to simulate disaster:
kubectl delete ds kube-proxy -n kube-system

# Verify that this daemonset no longer exists
kubectl get ds -A
Restore from Backup
💡 TIP: The kubelet runs the etcd pod directly (without kube-scheduler) and picks up the manifest in /etc/kubernetes/manifests/etcd.yaml
Restore from snapshot:
etcdctl snapshot restore snapshot --data-dir /var/lib/etcd-restore
Update etcd manifest:
Edit /etc/kubernetes/manifests/etcd.yaml and change line 88:
  - hostPath:
      path: /var/lib/etcd-restore # CHANGE THIS LINE
      type: DirectoryOrCreate
    name: etcd-data
⛔ STOP: The Kubernetes API will be unavailable until the etcd pod is restarted. This may take up to 3 minutes.
Verify restoration:
# Verify kube-proxy daemonset is restored
kubectl get ds -A

DNS and Service Discovery
Resolve IP from Pod
Create a deployment named apache which uses the httpd image.
kubectl create deploy apache --image httpd
Create a service named apache-svc from the apache deployment.
# Expose the deployment
kubectl expose deploy apache --name apache-svc --port 80
Create a Pod and Use DNS
Create a pod named netshoot that uses the nicolaka/netshoot image.
Exec into the pod and verify that you can reach the service by its name apache-svc
kubectl run netshoot --image nicolaka/netshoot --rm -it -- sh

wget -O- apache-svc
What happened from beginning to end:
When you create a deployment named apache using the httpd image, Kubernetes creates pods that run the Apache HTTP server. This deployment ensures that a specified number of replicas are always running.
Next, you expose the deployment as a service named apache-svc on port 80. This service acts as a stable endpoint for accessing the Apache pods, load balancing traffic between them.
Finally, you create a pod named netshoot using the nicolaka/netshoot image. Inside this pod, you use the wget command to request the apache-svc service by its name. Kubernetes' DNS service resolves the apache-svc hostname to the appropriate pod IP address, allowing the netshoot pod to successfully reach the Apache service.
Persistent Volumes
Create a Persistent Volume
Create a Persistent Volume (PV) named pv-volume that has the following specifications:
- a Delete persistentVolumeReclaimPolicy
- Uses the storageClass named local-path
- Uses hostPath volume type, at path /mnt/data
- Has a capacity of 1Gi
- Access mode is set to ReadWriteOnce
Once you've created the PV, list all the persistentvolumes in the cluster.
cat <<EOF | kubectl apply -f -
apiVersion: v1
kind: PersistentVolume
metadata:
  name: pv-volume
spec:
  persistentVolumeReclaimPolicy: Delete
  storageClassName: "local-path"
  hostPath:
    path: "/mnt/data"
  capacity:
    storage: 1Gi
  accessModes:
    - ReadWriteOnce
EOF

# List the PVs
kubectl get pv
Create Persistent Volume Claim
Create a Persistent Volume Claim (PVC) named pv-claim that has the following specifications:
- Uses the storageClass named local-path
- Access mode set to ReadWriteOnce
- Requests 1Gi of storage
Once you've created the PVC, list all the persistentvolumeclaims in the cluster.
cat <<EOF | kubectl apply -f -
apiVersion: v1
kind: PersistentVolumeClaim
metadata:
  name: pv-claim
  namespace: default
spec:
  storageClassName: "local-path"
  accessModes:
    - ReadWriteOnce
  resources:
    requests:
      storage: 1Gi
EOF

# List the PVCs
kubectl get pvc -n default
Create a Pod that Uses the PVC
Now that we have created the persistentvolume and the persistentvolumeclaim resources in Kubernetes, let's create a pod that can use the volume.
Create a pod named pv-pod that uses the image nginx with a volume named pv-storage. Mount the volume inside the container at /usr/share/nginx/html and specify the pvc by its name (pv-claim).
After you've created the pod, list all the pods in the default namespace.
cat <<EOF | kubectl apply -f -
apiVersion: v1
kind: Pod
metadata:
  name: pv-pod
spec:
  containers:
    - name: pv-container
      image: nginx
      volumeMounts:
        - mountPath: "/usr/share/nginx/html"
          name: pv-storage
  volumes:
    - name: pv-storage
      persistentVolumeClaim:
        claimName: pv-claim
EOF

# List the pods
kubectl get po -n default
Create a Second Pod
Now that our pod is created, and it's using the volume that we provisioned, let's write some data to the volume and see if the data persists beyond the life of the pod.
We'll start by getting a shell to the container in the pod pv-pod and performing the command:
echo "
This is my website!
" > /usr/share/nginx/html/index.htmlOnce you've written that index.html file to the volume, go ahead and delete the pod.
Start a new pod with the same specifications, but name it pv-pod2 instead of pv-pod. Get a shell to the nginx container running inside of pv-pod2 and see if the index.html file is still there. If it is, that means that our data persisted beyond the life of a pod.
kubectl delete po pv-pod

cat <<EOF | kubectl apply -f -
apiVersion: v1
kind: Pod
metadata:
  name: pv-pod2
spec:
  containers:
    - name: pv-container
      image: nginx
      volumeMounts:
        - mountPath: "/usr/share/nginx/html"
          name: pv-storage
  volumes:
    - name: pv-storage
      persistentVolumeClaim:
        claimName: pv-claim
EOF

# Get a shell to the nginx container in pod pv-pod2
kubectl exec -it pv-pod2 -- sh

# List the files in the nginx html directory
ls /usr/share/nginx/html/
NFS Volumes
Install NFS Server
Install an NFS server on node01. SSH to the worker node with the command ssh node01 (Worker node name).
Run the script located in the current directory with the command ./nfs-server-install.sh
NOTE: Select the defaults when prompted. This script will take about 3 minutes to complete. You will only be prompted once. When the script is finished, exit from the node01 server with the command exit
#!/bin/bash

apt update && apt -y upgrade

apt install -y nfs-server

mkdir /data

cat << EOF >> /etc/exports
/data *(rw,no_subtree_check,no_root_squash,insecure)
EOF

# /data *(rw,sync,no_root_squash,insecure)
# /data *(rw,no_subtree_check,no_root_squash,insecure)
# This was the original
# /data 172.30.2.2(rw,no_subtree_check,no_root_squash)

systemctl enable --now nfs-server

exportfs -ar

# exportfs -rav
# to mount this from another server (specific to killercoda)
# sudo apt update && sudo apt install nfs-common
# sudo mkdir /var/data
# sudo mount -t nfs -o nfsvers=3 172.30.2.2:/data /var/data
Create a Pod that Mounts the NFS Share
apiVersion: v1
kind: Pod
metadata:
  name: test
spec:
  containers:
    - name: alpine
      image: alpine:latest
      command: [ 'sh', '-c', 'while true; do echo "some text" >> /data/test; sleep 3600; done' ]
      volumeMounts:
        - name: nfs-volume
          mountPath: /data
  volumes:
    - name: nfs-volume
      nfs:
        server: 172.30.2.2
        path: /data
        readOnly: no
kubectl create -f nfs-pod.yaml

kubectl get po
View the Data Written by the Container
#!/bin/bash

sudo apt update && sudo apt install nfs-common

# to mount this from another server (specific to killercoda)

sudo mkdir /var/data
Run a Second Container that Shares the Same NFS Volume
Same pod file as above but change the name of the pod to test2
Run the pod and check if it's running.
Priority Classes
Understanding Priority Classes
What is priority class? Priority class is a Kubernetes feature that allows you to assign different priority levels to pods. This helps the scheduler determine the order in which pods should be scheduled and evicted, especially during cluster resource issues. Pods with higher priority classes are scheduled before those with lower priority classes, and in cases of resource scarcity, lower-priority pods may be evicted to make room for higher-priority ones.
In every Kubernetes cluster, there are two built-in high-priority classes. Use the kubectl command-line to view the default priorityclass.
# View the priority classes in a Kubernetes cluster
kubectl get priorityclass
These are reserved for Kubernetes system components like kube-dns, kube-proxy, etc.
Create a High Priority Class
You can search relevant kubectl commands and get help using the --help or -h flag. example: kubectl create priorityclass -h
kubectl create priorityclass high-priority --value 1000000 --description high-priority
Create Low Priority Pods
If no priority class is set in the pod spec, the pod gets a priority value of 0 by default. This means, it's the first to be evicted if the node is under memory or CPU pressure.
Create a deployment named low-prio that has 3 pod replicas. Use the polinux/stress image with the command ["stress"] and the argument ["--vm", "1", "--vm-bytes", "400M", "--timeout", "600s"]. The pod should request 500 Mebibytes of memory and 100 millicores of CPU.
cat <<EOF | kubectl apply -f -
apiVersion: apps/v1
kind: Deployment
metadata:
  name: low-prio
spec:
  replicas: 3
  selector:
    matchLabels:
      app: low-prio
  template:
    metadata:
      labels:
        app: low-prio
    spec:
      containers:
      - name: stress
        image: polinux/stress
        command: ["stress"]
        args: ["--vm", "1", "--vm-bytes", "400M", "--timeout", "600s"]
        resources:
          requests:
            memory: "500Mi"
            cpu: "100m"
EOF
Create High Priority Pods
You may have apps that must always stay running, such as:
- Logging/monitoring agents
- Control-plane components (in self-managed clusters)
- Payment gateways
- Message queues
Assigning them higher priority ensures they get scheduled first, and they don't get evicted before the lower priority pods.
Create a pod that uses the high-priority priority class created in a previous step. Name the pod high-prio and use the polinux/stress image with the command ["stress"] and args ["--cpu", "1", "--vm", "1", "--vm-bytes", "512M", "--timeout", "300s"]. The pod should request 200 mebibytes of memory and 200 millicores of CPU.
cat <<EOF > high-prio.yaml
apiVersion: v1
kind: Pod
metadata:
  name: high-prio
spec:
  priorityClassName: high-priority
  containers:
  - name: stress
    image: polinux/stress
    command: ["stress"]
    args: ["--cpu", "1", "--vm", "1", "--vm-bytes", "512M", "--timeout", "300s"]
    resources:
      requests:
        memory: "200Mi"
        cpu: "200m"
EOF

# Create the pod
kubectl create -f high-prio.yaml
Test Preemption
Preemption is the process of evicting pods with lower priority when the node experiences CPU or memory stress.
We can test preemption by simulating that stress and witness the lower priority pods get evicted.
Change the requests for the high priority pod from 200Mi to 600Mi and restart the pod.
Watch the low priority pod be evicted, and the high-priority pod get scheduled once again (this may take some time).
# Request additional memory
sed -i 's/200Mi/600Mi/' high-prio.yaml

# Restart the pod
kubectl replace -f high-prio.yaml --force

# Watch the low priority pod get evicted while the high priority gets scheduled again
kubectl get po -w
Database Operators
Understanding Operators
What is Operator in Kubernetes? An Operator is a method of packaging, deploying, and managing a Kubernetes application. It extends the Kubernetes API to create, configure, and manage instances of complex stateful applications on behalf of a Kubernetes user. Operators are built using custom resources and controllers, allowing them to automate tasks such as deployment, scaling, and backup of applications.
Install the Crunchy PostgreSQL Operator
# Create the namespace
kubectl create namespace pgo

# Install the operator
kubectl apply -f https://raw.githubusercontent.com/CrunchyData/postgres-operator/v5.0.3/installers/kubectl/postgres-operator.yml -n pgo
Create a PostgreSQL Cluster
# Create a PostgreSQL cluster named hippo in the pgo namespace
kubectl apply -f https://raw.githubusercontent.com/CrunchyData/postgres-operator/v5.0.3/installers/kubectl/cluster-hippo.yaml -n pgo

# Verify the cluster is created
kubectl get pgcluster -n pgo

# Verify the pods are running
kubectl get po -n pgo
Create Database CRD
# Create a PostgreSQL database named mydb in the hippo cluster
kubectl apply -f https://raw.githubusercontent.com/CrunchyData/postgres-operator/v5.0.3/installers/kubectl/database-mydb.yaml -n pgo

# Verify the database is created
kubectl get pgdatabase -n pgo
As part of creating a Postgres cluster, the Postgres Operator creates a PostgreSQL user account. The credentials for this account are stored in a Secret that has the name hippo-pguser-rhino.
List the secrets in the postgres-operator namespace with the following command.
kubectl -n postgres-operator get secrets

# Create a port forward. You can run the following commands to create a port forward.

export PG_CLUSTER_PRIMARY_POD=$(kubectl get pod -n postgres-operator -o name -l postgres-operator.crunchydata.com/cluster=hippo,postgres-operator.crunchydata.com/role=master)

kubectl -n postgres-operator port-forward "${PG_CLUSTER_PRIMARY_POD}" 5432:5432
Establish a connection to the PostgreSQL cluster. You can run the following commands to store the username, password, and database in an environment variable and connect.
export PG_CLUSTER_USER_SECRET_NAME=hippo-pguser-rhino

export PGPASSWORD=$(kubectl get secrets -n postgres-operator "${PG_CLUSTER_USER_SECRET_NAME}" -o go-template='{{.data.password | base64decode}}')

export PGUSER=$(kubectl get secrets -n postgres-operator "${PG_CLUSTER_USER_SECRET_NAME}" -o go-template='{{.data.user | base64decode}}')

export PGDATABASE=$(kubectl get secrets -n postgres-operator "${PG_CLUSTER_USER_SECRET_NAME}" -o go-template='{{.data.dbname | base64decode}}')
psql -h localhost

# Create a Schema with the following command.
CREATE SCHEMA rhino AUTHORIZATION rhino;
In PostgreSQL, creating a schema establishes a namespace within a database that can organize and isolate database objects such as tables, views, indexes, functions, and other entities. It allows for better management of database objects, particularly in environments where multiple users or applications interact with the same database.
Exit out of the postgres cli.
Scale the Database
Scaling a PostgreSQL cluster managed by the Crunchy Data Postgres Operator involves modifying the PostgresCluster Custom Resource Definition (CRD) to adjust the number of PostgreSQL instances (pods). The operator will handle the scaling process automatically once the changes are applied.
Fetch the current PostgresCluster YAML configuration to understand its structure. Look for the instances section under the spec field.
kubectl -n pgo get postgresclusters hippo -o yaml

# Edit the hippo postgres cluster in order to change the replica count.
kubectl edit postgresclusters hippo -n pgo
To scale the cluster, increase the number of replicas in the PostgresCluster to 3.
spec:
  instances:
  - name: instance1
    replicas: 3
Once the PostgresCluster resource is updated, the operator will detect the change and manage the scaling process. The operator will create 2 new pods.
kubectl -n pgo get pods
You can connect to the PostgreSQL service to verify it is handling requests correctly. The operator manages replicas and ensures the primary and replicas are in sync.
If necessary, check the logs of the operator for scaling-related messages.
kubectl logs -n pgo -l postgres-operator.crunchydata.com/control-plane=postgres-operator
Simulate a DB Failure
Simulating a pod failure in a Crunchy Data Postgres Operator-managed PostgreSQL cluster is a straightforward way to test the operator's recovery mechanisms.
# List the pods in your PostgreSQL cluster namespace.
kubectl -n pgo get pods

# You can tell which pod is the leader with the following command.
kubectl -n pgo get pods --show-labels | grep role

# Choose a pod to delete (e.g., hippo-instance1-0 for the primary or a replica)
kubectl -n pgo delete po hippo-instance1-0
This will simulate a failure by removing the pod.
The Crunchy Postgres Operator will automatically detect the failure and attempt to recover the pod.
kubectl -n pgo get pods -w

# Check the PostgresCluster resource for events related to the recovery.
kubectl -n pgo describe postgresclusters hippo
Look for events such as:
- The operator creating a new pod.
- Replica promotion (if the primary is deleted).
- Synchronization completion.
Check the operator logs for detailed information about how it handles the failure.
kubectl -n postgres-operator logs -l postgres-operator.crunchydata.com/control-plane=postgres-operator
Look for messages about:
- Pod recreation
- Replica promotion (if necessary)
- Readiness checks
Connect to the PostgreSQL database and run some basic queries to ensure it is functioning properly.
psql -h localhost

SELECT pg_is_in_recovery();
t : Indicates the node is a replica. f : Indicates the node is the primary.
Since we deleted a replica, confirm replication is still functioning.
kubectl exec -it -n pgo <replica-pod-name> -- psql -U postgres -d postgres
SELECT pg_last_wal_replay_lsn();
This shows the replication status from the primary's perspective.
Gateway API
Understanding Gateway API
A Gateway in Kubernetes is a networking resource that controls external traffic into a cluster, supporting HTTP, HTTPS, TCP, and UDP protocols. It acts as a central entry point, replacing Ingress, and works with GatewayClasses and Routes (HTTPRoute, TCPRoute, UDPRoute) for flexible traffic management.
A GatewayClass defines the implementation of a Gateway, specifying which controller (e.g., NGINX, Istio, Cilium) will manage it. It acts as a template for Gateways, similar to how storageClass works for PersistentVolumes.
Create a Basic Gateway
Install a basic Gateway resource named my-gateway in the default namespace. The gateway should be based on the gateway class nginx. You can view the gatewayClass with the command kubectl get gatewayclass.
The gateway will be listening on port 80.
# Deploy a basic Gateway that allows access to port 80 into the cluster
cat <<EOF | kubectl apply -f -
apiVersion: gateway.networking.k8s.io/v1
kind: Gateway
metadata:
 name: my-gateway
 namespace: default
spec:
 gatewayClassName: nginx
 listeners:
 - name: http
   protocol: HTTP
   port: 80
EOF

kubectl get gateway
Create a Deployment and Service
Deploy a simple web app in Kubernetes and a ClusterIP type service exposing the deployment on port 80 internally.
The name of the web app should be web and the image used should be nginx. Expose the container on port 80.
The name of the service should also be web, and the service should be exposed on port 80 targeting port 80 in the pod as well.
Use ONLY the kubectl command line arguments to get the web deployment and service up and running.
kubectl create deploy web --image nginx --port 80
kubectl expose deploy web --port 80 --target-port 80 --name web

kubectl get deploy,svc
Create Path-Based HTTPRoute
An HTTPRoute in Kubernetes defines routing rules for HTTP traffic, specifying how requests are forwarded from a Gateway to backend services. It supports host-based, path-based, and header-based routing, along with traffic splitting, retries, and filters.
Create a new HTTPRoute named web-route that will direct HTTP traffic to the underlying web service created in the previous step. Use path-based routing, and ensure all traffic to the domain handled by my-gateway is routed to the web service (setting the path to the root of the domain).
# Create an HTTPRoute named web-route and direct HTTP requests to the service web on port 80
cat <<EOF | kubectl apply -f -
apiVersion: gateway.networking.k8s.io/v1
kind: HTTPRoute
metadata:
  name: web-route
  namespace: default
spec:
  parentRefs:
  - name: my-gateway
  rules:
  - matches:
    - path:
        type: PathPrefix
        value: "/"
    backendRefs:
    - name: web
      port: 80
EOF

kubectl get httproute
Application Debugging
Debug Go Application
Many applications require specific environment variables to function properly. In this exercise, we'll debug a Go application that needs a PORT environment variable.
Create a Go application deployment:
# Create a deployment with a Go app that expects PORT env var
kubectl create deployment go-app --image=golang:1.19-alpine

# Check if pods are running
kubectl get pods

# Check pod logs for errors
kubectl logs deployment/go-app
Fix the deployment by adding the PORT environment variable:
# Method 1: Edit the deployment
kubectl edit deployment go-app
Add the environment variable in the deployment YAML:
spec:
  template:
    spec:
      containers:
      - name: golang
        image: golang:1.19-alpine
        env:
        - name: PORT
          value: "8080"
        ports:
        - containerPort: 8080
Method 2: Use kubectl set env command:
# Set environment variable using kubectl
kubectl set env deployment/go-app PORT=8080

# Verify the environment variable is set
kubectl describe deployment go-app | grep -A 5 Environment
Create a service to expose the application:
# Expose the deployment as a service
kubectl expose deployment go-app --port=8080 --target-port=8080 --name=go-app-service

# Get service details
kubectl get svc go-app-service
Test the application:
# Get service IP
SERVICE_IP=$(kubectl get svc go-app-service -o jsonpath='{.spec.clusterIP}')

# Test the app using curl
kubectl run test-pod --image=curlimages/curl --rm -it --restart=Never -- curl http://$SERVICE_IP:8080

# Or create a temporary pod for testing
kubectl run debug-pod --image=busybox --rm -it --restart=Never -- wget -qO- http://go-app-service:8080
Common Debugging Commands
# Check pod status and events
kubectl describe pod <pod-name>

# View pod logs
kubectl logs <pod-name>

# Get shell access to pod
kubectl exec -it <pod-name> -- /bin/sh

# Check environment variables in pod
kubectl exec <pod-name> -- env

# Port forward for local testing
kubectl port-forward deployment/go-app 8080:8080

# Check service endpoints
kubectl get endpoints go-app-service

# Test connectivity from another pod
kubectl run netshoot --image=nicolaka/netshoot --rm -it -- nslookup go-app-service
Troubleshooting Steps
- Check Pod Status - Verify pods are running and ready
- Review Logs - Look for application errors or missing configurations
- Verify Environment - Ensure required environment variables are set
- Test Connectivity - Use debug pods to test service connectivity
- Check Resources - Verify CPU/memory limits and requests
- Validate Configuration - Ensure proper port mappings and service configuration